Friday, January 30, 2015

DIY Perfect-Bound Notebooks

I've been making a concious effort of late to diversify this nerdy little blog of mine to encompass more of my hobbies beyond the collecting and painting of weird homunculi. One such hobby that I've been getting my teeth into lately is book binding.

The method I'm going to show you today, perfect-binding, is an excellent method for beginners because it is stitchless, and therefore does not require a lot of specialized materials like waxed thread, linen tapes, or a book binding jig. In fact, all it requires is your paper, some pva glue or book binding paste (easily made using cake flour and water), your cover stock, and something to clamp it all together.

What follows is a basic perfect-binding tutorial, demonstrated with a set of notebooks I made for my favorite ladyperson as a Saturnalia gift. If you find this interesting, there are myriad further tutorials to explore all over the internet. This one in particular is charmingly nerdy.

Makeshift pressing assembly and a needle file for scoring 

The first step is to assemble your text block. I made mine straight from packages of filler paper. I used two packages of graph paper divided into four text blocks, and three packages of regular line paper arranged into three text blocks. I made sure that the holes in the paper were on the right side of the block, opposite the spine, so they could be trimmed away later.

Above, you can see the first text block squared off and clamped into place. Eventually, I plan on building myself a basic (very basic) binding press, but for now I just made do with some scrap plywood and some clamps.

Once it's clamped in, it's a good idea to score the spine of the book with either an xacto knife or a file. This promotes a stronger bond with the glue. Apply the glue in thin coats using an old brush. I find that two or three coats is sufficient.

The first four glued text blocks

While waiting for the glue to dry, I prepared my covers. These were made using artist's vellum. I trimmed each sheet to the width of the final notebook, then taped the strip of waste paper accross the middle of each cover as a mask. Then, using an old toothbrush and some extra W&N ink mixes I had sitting around from my last painting project, I generously flicked a different color of ink on each cover. Once the ink was dry, I removed the mask to reveal a striking white stripe, perfect for writing down the class that the notebook is used for.

Covers in progress on my capacious workshop table.


Gluing on the covers can be a little tricky. Start by lining the cover up with your text block so that it's front edge lies just beyond your final trim width. Crease it so that it wraps around the spine, and then unfold the cover so it lies open. Apply a final layer of glue to the spine and then refold the cover. I like to use a bone folder or the back of a spoon to press the cover tightly along the spine. Refold the final crease and clamp the whole thing back in your press assembly. Once clamped, I go over the spine several more times with the spoon/bone folder to make sure that it adheres along its entire length. When satisfied, leave in the press until completely dry.

Untrimmed notebooks with covers applied

The final step is to trim your notebook to the final desired size. To do this, bookbinders use a very specialized tool called a binding plow, which is a sharp blade used in conjuntion with a guide on a finishing press to make an evenly trimmed edge on a finished book. These are very expensive and even DIY variations on the tool can get quite involved. Luckily, a passable alternative is to use a heavy-duty metal ruler or carpenter's square as a guide (clamped in place for greater stability) and a nice, sharp exacto blade.

Clamp your metal guide so that the edge matches precisely with your final trim size. Keeping your exacto blade flush with the guide, run it down the length of the book under very light pressure—don't use much more than the weight of your hand here, or else you will risk the edge becoming uneven. Light pressure and a sharp blade should be enough to cut through 1-3 sheets per pass. Because of this, the trimming process can be very tedious (though I actually find it pretty relaxing). Stick with it. The reward for your patience is a miraculously smooth edge.

The final notebooks, at home on my favorite ladyperson's favorite bookshelf
Any questions about this process? Leave a comment and I'll see if I can address it in a follow-up tutorial, wherein I will be binding my printout of the Labyrinth Lord rulebook.

Wednesday, January 28, 2015

Slagscape Conservation Collective


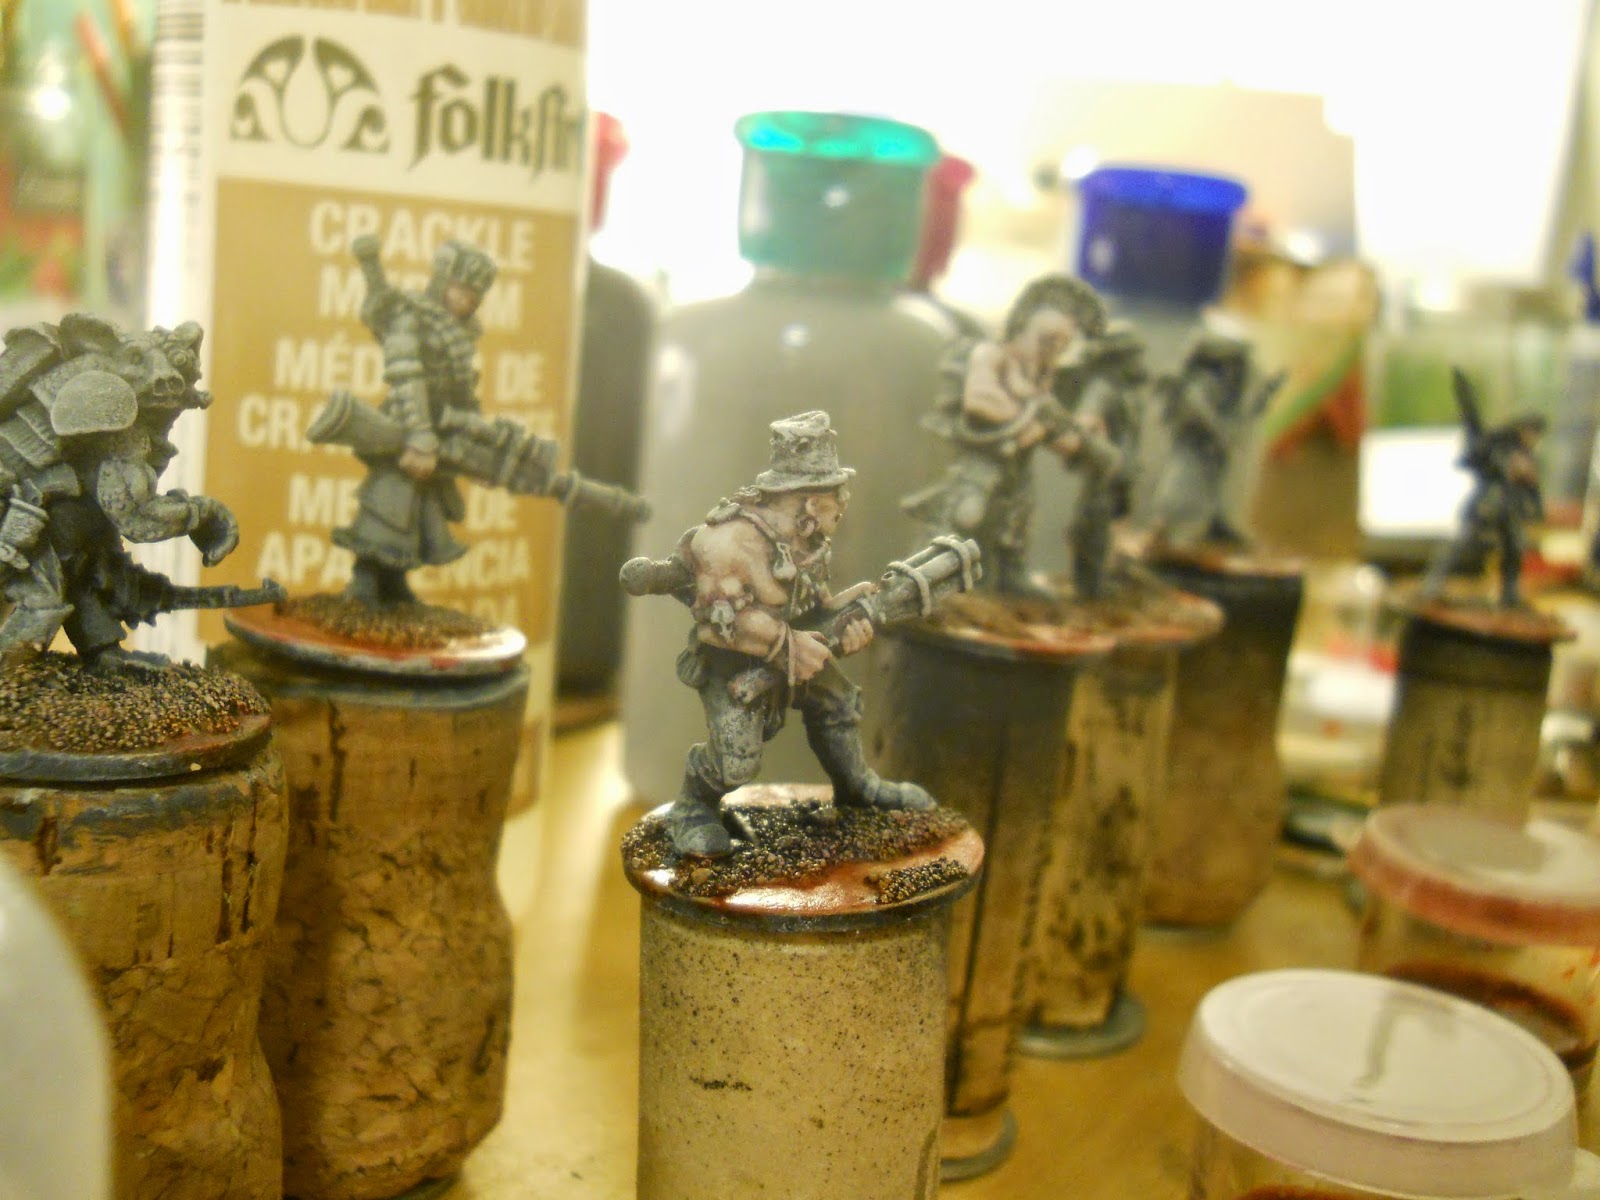
A picture-heavy post today showing the progression of my Nuclear Renaissance warband, the Slagscape Conservation Collective. 


My initial idea was that they are some kind of weird anarcho-primitivist cell that is utterly, fanatically devoted to the preservation of the molten, blasted wastelands of their home planet.


...more on that later, probably. Above and below you can see the figures all undershaded in grayscale, in preparation for glazes and inks.


I have to say that I really love this ApeX figure from the Reaper Bones line. So goofy and delightful.


In the background you can see the soupy, orangey inks applied to the bases. That's a soil composition unique to the slagscape. Rust colored. Mildly radioactive. Natural beauty.


Here I'm starting to do the skintones. This is a time-consuming but necessary step since the dry-brushing undercoat method does not make fro realistic skin.


Hard Joe Grubber

Once that's done, though, everything else moves pretty quickly, as a thin glaze or two on each area provides just enough tint to the undercoat to color it, while still retaining all of the highlights. This gives kind of a soft and warm old skool effect that I adore.

Emma Roadburn

Graf Moxxie

Mach Grezza

The above figure from Reaper cost like 7 bucks, but I could not resist. A spec-ops style armadillo man? Brilliant! I didn't like his little microphone much though, so I painted it up as a little cigar. He's pretty hardbitten, for an armadillo.

Lucy Havoc


Janx Moogin

Sprightly Jiles, Stunbrella Duelist

The Brain of Dr. Parcival Blythe, in the labotomized body of a Gorilla
What do you like most about the Slagscape? The pristine floes of molten metal? The hills of lovely and steaming cinder? The geysers of amonia that arc so prettily in the dying sunlight? Let me know in the comments below.

Monday, January 26, 2015

Odell IPA


I've been meaning for a while now to shamelessly rip off Randroid's awesome beer reviews. I find them quite interesting, being as I like beer more than most other beverages, and there are so many beers out there to try. So today I'm going to kick off what I hope will become a regular tribute to the genre with the Odell IPA.

From Odell's website:

"We took the traditional IPA, originally shipped from England to India in the 1700′s, and made it bolder and more flavorful – American Style. We’ve added new varieties of highly aromatic American hops to create a distinctive bitterness profile and an incredible hop character. 7.0%Alc. by Vol     60IBUs"

This beer looks like: a lovely orange gold color with a rocky, thick, white head.

...smells like: the first part of how a melon smells combined centaur-style with the second part of what a freshly opened orange smells like. So smells like a melange of melorange.

...tastes like: bitter citrus peal at first, like a dry, lemony taste. The malt flavor is crisp and clean with a medium body that makes this beer really satisfying. It finishes with a pleasant, mild bitterness.

...is ultimately like: a very balanced beer, especially for an American-style IPA. The hops are very judiciously blended here with bright bitterness and flavor and an enlivening aroma. A little trecherous, though, because the easy-drinking flavor belies the rather stiff 7% ABV. All in all, it's a killer quaff.

Got any favorites of your own? Crack one open and comment below.

Friday, January 23, 2015

Tar Eater!


My fellow CSW member, Karl, has a fun habit of just giving me stuff sometimes. (He's not the only one, either. I'm lucky enough to game with a group of guys who like giving me things. I'm certainly not going to complain.)


So when I was looking for a vehicle to use in Nuclear Renaissance and it turned out that Karl had a '57 Corvette he wasn't going to use...

I've long been a fan of Carmen's awesome custom post-apocalyptic death racers, and this was the perfect opportunity to try my hand at making one of my own.


I removed the undercarriage, which allowed me to attach the wheels directly to the body, lowering the ride sufficiently to make sure the car would scale at 28mm. Then I glued the windshield in place, fashioned blast shields from plasticard and a hood-mounted cannon from a ball point ink reservoir and the tip of a pencap. Then I started to get a little whimsical, and gave the sucker jet propulsion using the other end of the pencap glued to a superglue cap, with guitar string fuel lines.


In the above couple of pictures, you can see it primed and drybrushed in gray-scale. Here's an Amateur Tip if you decide to do one of these yourself: the wheels are made of a soft plastic that gets really sticky after spraying, so I recommend either masking or undercoating them before priming.


Painting was very basic, pretty much just covering the whole model in a diluted rust-colored glaze made from W&N inks. I then painted up the windshield, attempting to follow this excellent tutorial on SpacemanSpiff's blog, ending with a red glaze for both the windshield and the blazes on the sides—to reflect the red, glowering atmosphere of the slagscape through which this beast must hurtle.


The last step was the christening, above. Not just a name, an imperative. An expression of a need, the need for octane, the need to chew up road and spit it out in ribbons, to sear across the landscape and watch it bend and blur as though—maybe, possibly—it might not be real. In the ruined future, there's only one way to be...


...and that's fast.


Thinking of leaving a comment? Don't bother. Words are meaningless, velocity is everything. Put the pedal to the metal and fly.

Wednesday, January 21, 2015

Prodigious Gloat

As promised in my last post, here's a quick tutorial on how I did the skin tones on Prodigious Gloat, the ogre player for my human Blood Bowl team, the Synnetowne Abbey Manglers.

This is a simplified and customized (and less skillfully and less stunningly executed) version of the method found here. You want a trip? Scroll down to the comments to see how John Effin Blanche answered my question about Winsor & Newton inks!

I've altered the above procedure for a ruddier, more flushed result, but the same basic method can be applied to any variety of wacky color schemes with good results.


The first step is to mix up a base tone. For this I used a mix of about 1:1:1:8 (or so) Primary Red:Cadmium Yellow: Dark Chocolate Brown: White. The key to a good base coat is to make sure that it's pale enough. This can be really hard to judge...I almost always end up worrying that I've added to much white, but it's never the case.

You can see the base coat on the top half of Gloat in the picture above. The legs and feet are already on step two, which is a general wash of diluted W&N inks in a mixture of 1:1 Crimson Red:Peat Brown (this mixture is designed to represent the areas on the skin where the blood is visible, which is useful to keep in mind when designing less conventional schemes. The contrast of hue that it adds really makes the effect work.) If you do not use inks, you can make a passable wash by diluting your desired acrylic color with water and matte medium (Liquitex matte medium is a nice value brand available at craft stores), though you might have to apply a couple more coats to achieve the same vibrancy.

A final note on W&N inks: these suckers do not 'set.' If you go over them with wet paint, they will bleed and run. This can be a real pain if you aren't expecting it, but it is also something of a boon for blending if you know that it's going to happen. It basically allows for easy as pie wet blending, which makes for a really nice effect for all kinds of things.


Once the wash has dried, go back in and reapply the original base coat as the first highlight. You should notice the red/brown mixture seeping in a little from the recesses.


Now simply begin highlighting while increasing the proportion of white, and keeping the mix thin with water and matte medium. I tend to work on a wet-palette, which means I can keep a pool of my base color next to a pool of white and gradually form a gradient between them. That way if I need to go back and fix something, I can easily return to taking paint from a darker portion of the gradient.


After that, it's basically just a matter of continuing to highlight until you think the overall tone is light enough. Above you can see I'm probably on my second or third highlight. (I work quick with more dramatic steps than most; blending is not my forte.)


Once I'm nearly satisfied with the highlights, but before the final layer, I go back with a very dilute red ink and glaze over the boils, lips, nose, and nipples. After that dries, I go ahead with the final highlight, bringing everything into balance.


I called it done at this point because the Gloat looked plenty flushed and sweaty; however for a more pale/sickly/eerie effect I will often go in and apply a very faint glaze of blue mixed with brown to the raised areas. The idea there is to have the fleshy or fatty areas contrast with the reddish bloody areas. In this scheme, that means contrasting warm and cool colors, though it could easily be the reverse when painting something a little more...imaginative.

Let me know what you think, or if you have any questions, by building up your query in delicate layers in the comments box, just down there.

Saturday, January 17, 2015

Synntowne Abbey Manglers


Still digging through the old backlog, and in so doing I found the in-progress photos I took of my Chaos Cup 2014 team, the Synntowne Abbey Manglers. This was a teamed formed by the rambunctious monks of the monastery at Synnetowne. Their enjoyment of the thrill and violence of the Gorious Sport was such that it became encorporated into their spiritual life. Never is a monk of Synnetown closer to God than when he is pushing an opposing player's face into the pitch.


Above is the undershaded team. Since I had to paint these guys in record time for me (something like two or three days) I was relying very heavily on the undershade and glaze/wash technique. (Nevermind that I've been assembling this team for literally years.)


And here's the guy I purchased specially from Reaper to round out the big guy slot on the team. His mangled mug just screamed athlete to me. Of course, I had to do some work to make him pitch-ready; I hacked off his club (and carefully filed it in my bits box for future use) and sculpted up a little football, leather helmet, and jock strap.


If you've ever played Blood Bowl, you'll know that it's not very often that an Ogre gets to handle the ball, but the pose was so perfect and the idea so amusing that I just had to go with it. 


So the monks took in Prodigious Groat as an initiate. It's true he was not the most pious, nor the most community-minded. But he surely was a useful fellow to have on the Line of Scrimmage, and that would give him some grace with the bloody deity of Synnetowne Abbey.


As turn counters, I slapped my extra 2014 Chaos Cup model onto a washer and rigged together a banner pole for a team flag:


Below is a (rather blurry, sorry) picture of the finished team. If you look close at the flag, you'll see that the Order's motto is Ora et Pulta (meaning pray and pummel), a spoof of the Benedictine motto of Ora et Labora. 


Thanks for looking. Next time I'll post a quick tutorial on how I painted the skintones on Prodigious Groat. 

For the curious, below is the roster I used in the tournament. The incurious but talkative may skip down to the comments box and let me know what they think. Those who are both incurious and untalkative can do whatever they want. It's their life.


Wednesday, January 7, 2015

Glimmergulch


In radiance set the sun, pursued at a careful distance by the pinkish mist that obliterated cairn and chasm even in their moment of crepuscular glory. The only thing exempt from the forgetfulness of dusk was the hunched but significant figure of a man as he sat on the brow of a knoll above the fog, tending the nascent curl of a campfire, his back against the stump of a wasted tree.

To this prominent figure, as to a beacon, young Soupcrumb made his way along the sodden track. He was hungry and tired, and his feet were scraped and raw. There was black mud between his toes.

Soupcrumb crawled into the fire's gathering radiance without remark, but without bothering to hide either. For a while the huge man did not seem to notice his presence, but at last he broke the silence with a not unfriendly grunt: "And what finds you here, little waif? Fey thing, are you? Come out of the mist to play my eyes for fools? Some Spinney-scamp come to lead me into a depthy swale?” The question did not seem serious to Soupcrumb. It was as though the big man had been expecting him, and that his surprise was some ineffable kind of joke.

Soupcrumb was not scared, and the big man seemed to notice this. “My name is Glimmergulch, boy. Now tell me why you soil my fireside.”

At last Soupcrumb spoke: "No Spinney-scamp am I, though as much I may become. I was a Skeldkryk farmer's son. But I stole away. Raising cabbages is a shit life, and my Pa's a cruel arse. I set fire to his shed and then I ran."

There was a voluminous pouch by the Glimmergulch’s side, partially concealed in the many hides which he wore draped about him. Shifting the stave that protruded from its mouth, he produced a crust of dark bread and an ale skin, which he offered to Soupcrumb. The boy filled himself eagerly.

Glimmergulch scratched his copious whiskers as he watched the boy drink. "So you are here now, and hoping your Pa will forget about you. There are many such in these parts. Mark me boy!" Soupcrumb looked dizzily up from his meal, for the ale had been strong and it clouded his wits. As his eyes climbed, the giant shifted aside his great hide cloak to reveal a polished gut-plate of a somnolent emerald luster and the size of a well cover. A black spiral was cunningly inlaid into the lacquer, and it seemed to Soupcrumb that this spiral traversed an incomprehensible dimension. His jaw grew slack. He was aware--faintly--that the man was speaking.

"My name may be Glimmergulch, thing, but none call me that anymore. What they call me, when they remember to call me anything, is the Overlooked. I know what it's like to be well and truly forgotten. You see, even you've forgotten me.” The clod released a low chuckle. Soupcrumb’s head bobbed in hypnotized time with the motion of his diaphragm. “I saw you but yesterday morning. I saw your Da' take up the thresher. He saw me too, which is what stayed his ire. But he doesn’t remember me either. I handed you the torch that kindled your Da's shed, do you not remember you miserable child? Of course not. None remember me. But you remembered where I told you to find me, though you hardly knew it. And now you'll never have to see your mean old Da' again."

The unfortunate boy finally collapsed in a heap by the cold embers of the fire. The night had already passed away, not wishing to linger on such a scene. From Glimmergulch’s pouch came a tittering. He withdrew the wooden stave which was his cudgel and It winked and gibbered at him. " More fuel for the fire, eh Glim? A tasty morsel you've won tonight," it sang. " Do let me crack his eggbasket, do."

"Nay twig. This one's to be laid by, for I have on the morrow to bargain with Toads, and they like their currency fresh."

“Tender! Tender tender for the toads,” giggled his cudgel.

Glimmergulch swept the unconscious Soupcrumb into his sack with the crook of a massive elbow, and swung it over his shoulder as he began slowly to plod down the cold little hill. Around him the dawn gathered and the mist began to disperse, revealing the faint outlines of berms and barrows like the traces of a haunting memory.


Monday, January 5, 2015

The Fur of the Bear that Bit You

Though I have now made two different homemade battlemats that entirely satisfy my wargaming needs, yet whenever I see even the hint of a new article on the subject, I'm on it like fur on a teddy bear. Or off of a teddy bear, as the case may be.


In fact, it turns out that the stuff is an excellent, inexpensive material for making grass wargaming surfaces that are even more durable, portable, hugable, and storable than the canvas versions I have previously dealt with. 

Apparently this was a secret to exactly no one except for me. Historical wargamers have been doing this for stuffed dog's years. Some of the better examples that I've found (which is to say that they're stunning) are here and, especially, here (make sure to browse through the articles, as this guy has done several mats and each one is better than the last. Inspired, I made my way to this (admittedly kind of creepy) craft website to purchase a couple of yards of neutral colored, short-pile, synthetic bear fur.


So here's a test piece for your delectation. Above is after a rough trimming with scissors to rough up the fur a bit and to make it easier for minis to stand. Below is after I haphazardly smeared some thinned out greens and yellows in. 


I was so pleased with the results that I immediately measured and cut out a 4' square to get started on... 


...and then promptly moved apartments and forgot about the project for a while. But now I'm (quite more than) settled in, and this project is at the top of the list. Stay tuned for the detailed results of my experimentations.

...Should you post a comment in the meantime? Does a teddy bear shit in the closet?